Use Powershell to gather information of remote machine or users

This article will be updated.

[UPDATE: 11 nov 2022]

# Get OS version of remote machine
Get-WmiObject Win32_OperatingSystem -ComputerName "Remote_Machine_Name" | Select PSComputerName, Caption, OSArchitecture, Version, BuildNumber | FL

# Get OS version of all computers in an Organizational Unit (OU)
Get-ADComputer -SearchBase "The OU DistinguishedName like: OU=...,OU=...,DC=...,DC=..." -filter * -Properties operatingsystemversion | Select-Object name,operatingsystemversion

Find different info about a machine

# Get all the computers in Active Directory (AD) on a given OU that contains the term "SSD" in the Description field
Get-ADComputer -SearchBase "The OU DistinguishedName" -filter 'Description -like "*SSD*"' | ft Name

# Check if server si physical or VM
get-wmiobject -ComputerName "Remote_Machine_Name" win32_computersystem | fl model

# Check uptime of a machine
(Get-CimInstance -ClassName Win32_OperatingSystem -ComputerName "Remote_Machine_Name").LastBootUpTime

Open sysadmin .msc and .cpl consoles from Windows Run

This article will be updated.

[UPDATE: 20 nov 2022]

CommandWhat It Does
dsa.mscOpens Active Directory Users and Computers
adsiOpens Active Directory Services Interfaces (Edit AD properties)
dsacOpens Active Directory Administrative Center (Deleted objects)
Compmgmt.mscOpens the computer management console.
Devmgmt.mscOpens the device manager.
Diskmgmt.mscOpens the disk management tool.
Eventvwr.mscOpens the event viewer.
Fsmgmt.mscOpens shared folders.
Gpedit.mscOpens the group policy editor.
Lusrmgr.mscOpens the local users and groups.
Mailto:Opens the default email client.
MsconfigOpens the system configuration utility.
Msinfo32Opens the system information utility.
Perfmon.mscOpens the performance monitor.
RegeditOpens the registry editor.
Rsop.mscOpens resultant set of policy.
Secpol.mscOpens local security settings.
Services.mscOpens services utility.
System.iniWindows loading information.
Win.iniWindows loading information.
WinverShows current version of Windows.

And to open Control Panel consoles:

CommandWhat It Does
Appwiz.cplAdd/Remove Programs
Timedate.cplDate/Time Properties
Desk.cplDisplay Properties
FontsFonts Folder
Inetcpl.cplInternet Properties
Main.cpl keyboardKeyboard Properties
Main.cplMouse Properties
Mmsys.cplMultimedia Properties
Mmsys.cpl soundsSound Properties
Sysdm.cplSystem Properties

More here: https://www.lifewire.com/windows-run-command-guide-3401937

How to post to Instagram from your desktop (using Google Chrome or Safari)

I found myself very often editing a photo on the computer and wanting to post it on Instagram, but guess what, you cannot do that from your desktop/laptop, you can post only from the mobile app. I find it frustrating to transfer the photo online and post from the mobile app.

So, if you ever logged in your Instagram account from a desktop computer/laptop and found out, freaking out like crazy that you don’t see a way to post a photo from the computer, this post is for you. You can post on Instagram from your computer with this simple trick.

Instagram was built only for posting pictures from mobile devices. The thing is, on a computer, to essentially trick the Instagram website to act like you are viewing the page from a mobile device. We will use a free Chrome extension.

If you use Safari, click here.

If you use Google Chrome, read ahead.

  1. Open Chrome and go to Chrome Web Store. Search for user agent switcher. Install the one pointed by the arrow in the image bellow (Fig. 1).

1 user agent switcher

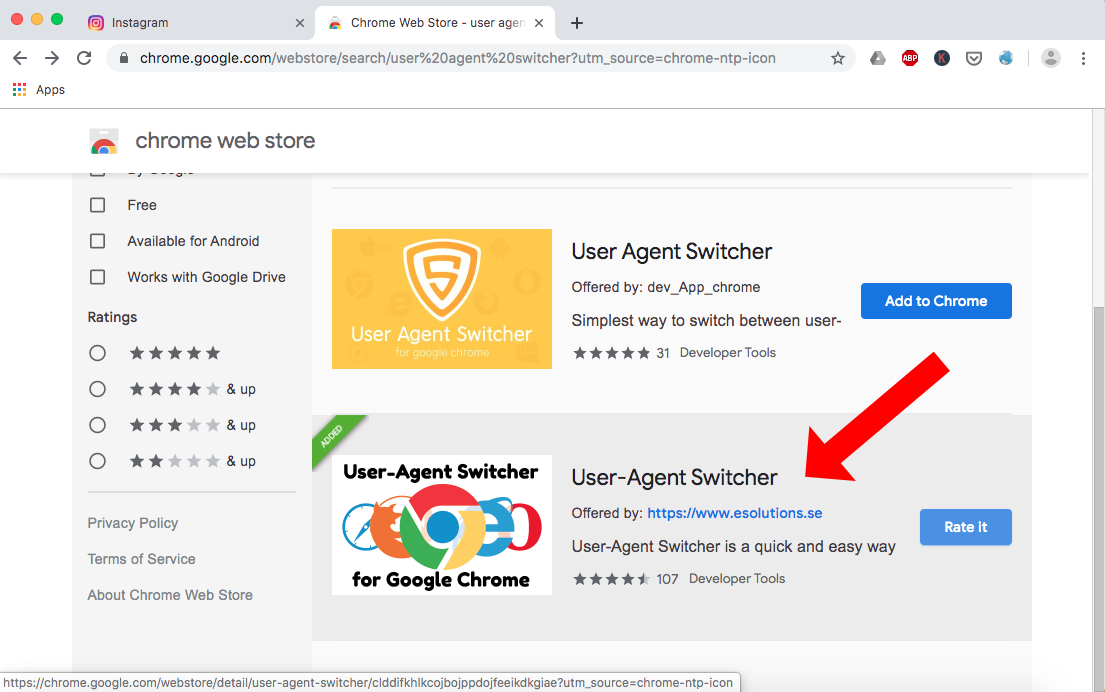
Fig. 1 – Install this User-Agent Switcher, Google Chrome extension

2. Now, if you go to the Instagram website and login to your account, you will see in the top right: the Explore icon, the Likes icon and Account icon (Fig. 2 arrow 1). Also in the bottom part, you don’t have the bar with the “+” icon used in the mobile app to upload pictures (Fig. 2 -arrow 2).

2 login instagram

Fig. 2 – No Upload button “+”

3. From the top right of Chrome, click on the User-Agent Switcher icon (Fig. 3 arrow 1) and select a view on a mobile device. I used “Chrome on Android Mobile” (Fig. 3 arrow 2).

Now the page will reload and the bar with the “+” button appears (Fig. 3 arrow 3) on the bottom of the Instagram website. 🤪

3 post bar in Instagram

Fig. 3 – After switching to a mobile device view, the bottom bar appears. Here you can use the “+” button to upload a picture.

After you upload the picture, at the bottom of the page you will also get the Instagram Filters. 😜

4 Instagram filters

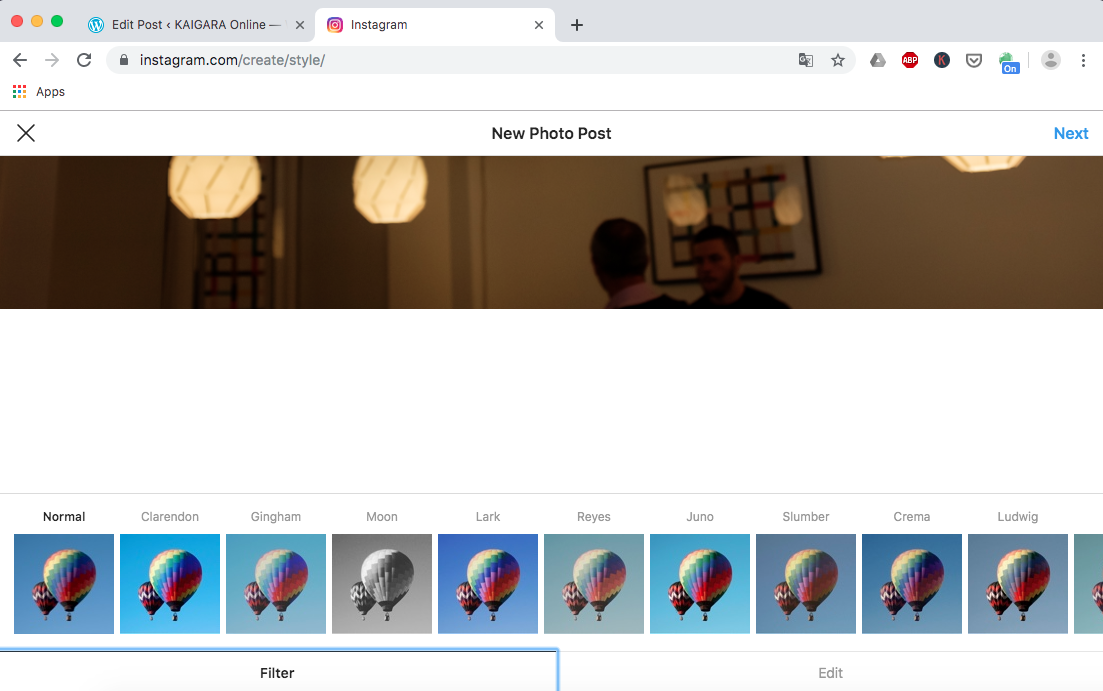
Fig. 4 – You will also get access to the Instagram Filters

Limitations: You cannot upload multiple photos in a single post.

Have fun!! 🤗

Facetime and iMessages – How to fix (fast): “An error occurred during activation. Try again”

There is a time in the life of a mac user when you open Facetime or iMessages and boom! You get the activation error: “An error occurred during activation. Try again” 🤬

You put the AppleID and password and nope…same error there. 🤬🤬

Now as a normal person, you go online and Google that shit. There are tones of websites and videos but the guy at saintlad put together in very structured way 13 fixes.

The thing is, I did ’em all one by one and following Murphy’s Laws the 13th worked! 🤗🤣🤩 (you can try them all, they might work for you).

So what worked for me was this (deleting and let the system recreate the Mac’s Push Notifications file):

  1. Open Finder
  2. Go to your hard drive > Library > Preferences
  3. Delete the file com.apple.apsd.plist
  4. Enter the admin password when prompted
  5. Restart your Mac and login to Facetime or iMessages

Have fun! 😉

Turn Smart Card or USB storage On/Off using Windows registry

There are times when the USB storage is disabled or the Smart Card is enabled. You need the USB and/or you can’t log on.

Reboot in Safe Mode and login with Administrator, then head up to:

regedit

USB on:
HKEY LOCAL MACHINE/System/CurrentControlSet/Services/USBstor start 3
4 for off

Priv_off:
HKEY LOCAL MACHINE/Software/Microsoft/Windows/CurrentVersion/policies/system/ scforceoption 0
1 for on

How to reset the password for the local Administrator account (or enable it) using Linux

If you have a personal computer maybe this is nothing you encounter very often.

If you have a computer in a network, in a domain maybe, you will definitely need at some point the local Administrator password. This occurs with various issues like the computer going out of the domain or user accounts problems.

There are 2 common situations:

  1. You know the Administrator password but the account is disabled.
  2. You don’t know/forgot the Administrator password.

The method below will help on both problems.

The Linux command used is chntpw.

Note: HirenBootCD uses the same application.

chntpw is not installed by default on Linux distros so you have to install it from your Package Manager.

I have it on a bootable USB flash with Puppy Linux. Here is my presentation of Puppy Linux.

DISCLAIMER!!! Resetting the Administrator password with this method is considered brute force cracking and not permitted in networks. It might be illegal in your area. The method below is only for educational purposes and you should never do that. System Administrators will detect that. If you can’t access a computer, always ask help from the System Administrator.

How to use it (i assume we use Windows XP but the method is use for other version of Windows):

  1. Boot the machine with the Puppy Linux USB flash.
  2. Make sure the Windows partition where the Windows folder is mounted.
  3. Open a Terminal and navigate to the location of your SAM file (in Windows XP is here: C:\WINDOWS\system32\config). For other versions of Windows find the SAM file location first.
  4. Type this at the prompt, without quotes: “sudo chntpw -u Administrator SAM“.
  5. Here you will be given some options. The 1st one is to reset the Administrator with a blank password and the 4th is to enable the Administrator account.
  6. Depending of your situation, enter a number and press [Enter].
  7. When the app asks you to write the SAM file, choose [y] and press [Enter].
  8. Reboot and login. If you enabled the Account, login with the password you knew. If you reset the account, use a blank password.
  9. Always remember your local Administrator password and disable the account after you did your job.

Happy day!

Windows 10 not showing in GRUB boot menu of Linux Mint

A rule of thumb for dual booting Linux and Windows is to install Windows first.

But as anomalies in the Matrix exist, doing so may cause to have only Linux in GRUB boot menu (the linux boot menu that let you choose the operating system you want to boot into).

There are GUI programs to fix this but i will show you the Terminal way. I know the linux Terminal is scary but you’ll se you have nothing to worry about.

Look at the bright side, it’s an exercise for linux Terminal and editing a text file.

So, it’s simple as that:

  1. Open a Terminal.
  2. Type without quotes: “sudo nano /etc/grub.d/40_custom”
  3. Enter your password.
  4. Add this to the file:

menuentry ‘Windows 10′ {

set root='(hd0,msdos1)’

chainloader +1

}

5. Save and exit the text editor.

6. Also on the Terminal, type without quotes: “sudo update-grub2”.

7. Enter your password.

8. Restart and enjoy.


Windows: File associations per user

If file associations are messed up on a specific user and the File Associations in Folder Options are correct, do this:

  1. Press [Win+R]
  2. Type regedit and press [Enter] to open Regedit (the registry editor)
  3. Navigate to HKEY_CURRENT_USER\Software\Classes
  4. Find you file type and see the software opens it. Usually the path to the software is messed up. Correct it and restart the computer.

I had a problem with .xls files on a single user like double clicking the file and nothing happened. If I opened Excel and did an Open for the file, it worked, but no double clicking.

NOTE: System wide file associations are in HKEY_LOCAL_MACHINE\Software\Classes.

Windows 7: Create new domain profile with the same name as an existing one

Original thread here and original of the original thread here. ^-^

  1. Rename the user’s profile folder to Bob.old
  2. Logged in as an admin, go to Control Panel → User Accounts → Manage User Accounts. Domain accounts show there after an initial login.
  3. Delete the account for Bob
  4. Open regedit and make sure that the user is no longer in HKEY_LOCAL_MACHINE\SOFTWARE\Microsoft\Windows NT\CurrentVersion\ProfileList. Delete it if present, even if it is followed by “.bak”.

Then you can login as bob to recreate the local user profile, then copy your user data into it. “